Posts

Showing posts from August, 2019

How to configure Biometric(Biomax) N-BM160W for online software?

Image
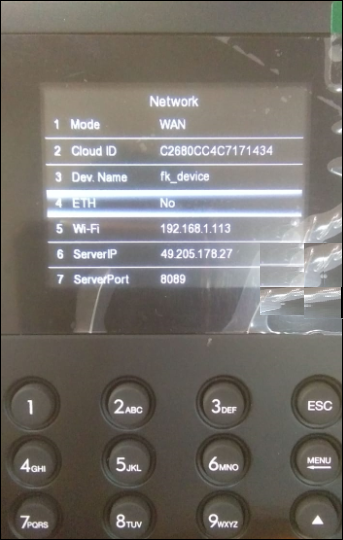
Biomax N-BM160W Configuration Step-1 Press Menu Button Select Settings Press OK Select Network Press OK Go to Mode(1) Press OK Select WAN Press OK Go to WiFi(5) Select Yes Press OK Go to Search(8) Select WiFi SSID Press OK Enter WiFi   Password Press OK Go to Server IP(6) Enter Static IP Press OK Go to Server Port(7) Enter Port Number Press OK Press ESC Press OK (When prompt message Are You Sure Want to Save? ) Step-2 Login Your Smart Office Console(Hosted) Go to Device Management Click on Devices Click on Add New Device Then Enter Device Name and Short Name Enter Cloud ID in the place of Serial Number Enter IP Address  Click on Save

How to record and upload DISA or Greeting/Welcome message in panasonic ns300 epabx?

Image
You can record DISA/Welcome message easily by KTS phone. 1- For Recording Your Message Go on KTS Phone Press SP-Phone Enter *361501 Display Wait Message then start timing in Second Start speaking for recording your Greeting Message Press Store      For Listen Playback ( Your Recorded Message) Press  SP-Phone Enter *362501 2- Uploading ( Your Recorded Message) Login your  Web Maintenance Console Click on  Maintenance Go to Utility Expand File Select Message File Transfer PC to PBX Click on Choose File Click on OK

How to configure Group FWD button for ICD Group in panasonic epabx?

DSS Buttons- You can configure DSS buttons as FWD Group for both intercom and outside calls- Press  Program Press Desigred  Button Press  " 44 " Enter  ICD Group No. Enter Extention Number Press  Store

How to configure DSS button for one-touch dialing number in panasonic epabx?

DSS Buttons- You can configure DSS buttons for One-Touch Dialing Number- Press  Program Press Desigred  Button Press  " 2 " Enter  Mobile Number Press  Store

How to configure DSS button for extention number in panasonic epabx?

DSS Buttons- You can configure DSS buttons as an extention- Press Program Press Desigred Button Press " 1 " Enter Extention Number Press Store

How to configure Single-CO (S-CO) line at extention in panasonic ns300?

Single-CO(S-CO) Line- This feature is used to select a line for making call from any extention. This feature is configured when we are using Analouge Line. Go to Extention Press Program   Press Desigred Button Type the Line Number Press Store

How to configure PDN/SDN button in panasonic epabx?

Primary Directory Number (PDN) Button- This button is used to make and receive calls (including both outside and intercom calls). PDN buttons allows multiple calls for waiting at the extention. Press Program   Press Desigred Button Select PDN Press Store Secondary Directory Number (SDN) Button- SDN button displays the current call status of the registered extention, similar to a DSS button. Press Program  Press Desigred Button Select SDN Press Store Note-   One extention can have up to 8 PDN buttons. An extention can have only one SDN button for each PDN extention.

How to reset CA Communication password of extention in panasonic ns300 epabx?

Resetting CA Communication Password Press  Program Button  on KTS Phone Press (* 1) Set the  Password (1234) Select +91 Enter Enter Extention No. Enter Press Hold Again Press Program

How to configure Automatic and Manual Call waiting for receiving calls in panasonic ns300 epabx?

Image
Receiving Call Waiting- You can set call waiting for extention.    *7311     To Set/Cancel for Intercom Calls (Manual Call Waiting)    Automatic Call Waiting "ON" for Extention Call Login your  Web Maintenance Console Go to  PBX Configuration Click on  System Select  System Option Go to Option 5 Click on Enable *7321     To Set/Cancel for Outside Calls (Automatic Call Wailting)

How to deny possibility of picking up your calls from others people?

Image
Call Pickup Deny- You can deny or allow other people to pick up your call.

How to switch our manager extention at night mode and day mode? How to change Time Service Switching Mode?

Image
Time Service Switching Mode Control- There are two method ( Automatic or Manual ) of changing the time mode. Method-1 Login your  Web Maintenance Console Go to  PBX configuration Click on System Select Week Table Then you can select tab Automatic or Manual You can change also timing after clicking Time Setting Method-2 You can also set this from your manager extentions manually. Method-3 You can enter ICD Group or Extention for Day and Night Mode incomming call saperately. for this settings you can go below link- https://onlinewebit.blogspot.com/2019/08/how-to-configure-incomming-call_22.html  

How to forward (FWD) your incomming calls from one extention to another extention or mobile phone?

Image
Forwarding your Calls (Call Forwarding [FWD])- You can forward your call to a specific destination. All Calls: All Calls forwarded. Means intercom and outside calls both. Busy: All calls forwarded when your extention is busy. No Answer: All call forwarded when you do not pick up the phone within a specific time period. Busy/No Answer (BSY/NA): All call forwarded when your extention or busy or do not answer the call. Programming(Step-1) Press  Program Button  on KTS Phone Enter the  Programing Code (* #) Enter the  Password (1234) Enter the  Sys Program No (503) Enter Select COS No. Then Select Enable Enter END     Call Transfer to Trunk Press  Program Button  on KTS Phone Enter the  Programing Code (* #) Enter the  Password (1234) Enter the  Sys Program No (504) Enter Select COS No. Then Select Enable Enter END     Call Forwarding to Trunk User[Extention] Side Configuration(Step-2) Boss & Secretary Feature.     To Set/Cancel

How to configure CO Lines or LCOT/BRI Trunk connection in panasonic ns300 epabx?

Image
Configuration of CO Lines/LCOT- Method-1 Press  Program Button  on KTS Phone Enter the  Programing Code (* #) Enter the  Password (1234) Enter the  Sys Program No (400) Enter Go to Slot No and Port No Select No Connect or Connect by pessing Auto Answer Enter END Next the smae proceedure for other CO Lines Method-2 Login your Web Maintenance Console Go to PBX Configuration Click on Configuration Select Slot Then Click on Card No-1(LCOT6) Click on Port Property Go to Connection Column Click on OUS Select INS for desire CO Line that you want connect

How to configure Incomming Call Settings in panasonic ns300 epabx.

Image
You can configure and manage incomming call settings. Login your Web Maintenance Console Go to  PBX configuration Click on  CO & Incomming Call Select  DIL Table & Port Settings Tap on DIL And Enter the  ICD Group No/DISA/Extention  in  DIL Destination Day/Night/Lunch/Break

How to set verification code in panasonic ns300 epabx?

Image
This feature is called User Remote COS Access . After configuration this you can make a call to anyone by entering verification code and verification code PIN from any other extention. This feature is used to prevent calling from unathorised person. Note- You can set Quick Dial for *47* as a single number. Login your  Web Maintenance Console Go to  PBX Configuration Click on  System Expand  Numbering Plan Select Quick Dial Set any number in single digit for *47* Configurations- Method-1 Verification Code Verification Code Name Verification Code Personal Identification Number(PIN) Verification Code COS Number   Method-2 Login your Web Maintenance Console Go to PBX Configuration Click on Feature Select Verification Code Then Enter the value in digits according given headings

How to configure Incomming Call Distribution Group in panasonic ns300 epabx.

Image
ICD Group(Incomming Call Distribution Group) If you want in multiple places same time ring then you can apply ICDG settings. login your  Web Maintenance Console Go to PBX Configuration Click on Group Expand Incomming Call Distribution Group Select Group Settings Click on Member List Select ICD Group No. Like- 601, 602, 603......(Max upto 64) Then Enter Extention Number (Max upto 32) and Set Delayed Ring Then go on below link for further settings-            https://onlinewebit.blogspot.com/2019/08/how-to-configure-incomming-call_22.html

How to remove all setting from your extention (Extention Feature Clear) in panasonic ns300 epabx?

Image
Clearing features set at your extention. You can reset setting of the following feature on your extention to the default settings with one operation. Features Default Settings Hot Line Off Message Waiting Off Absent Message Off Call Forwarding(FWD) Off Do Not Disturb(DND) Off BGM Off Data Line Security Off Call Pickup Deny Allow Paging Deny Allow Executive Busy Override Deny Allow Call Waiting for Intercom call Disable(No Call) Call Waiting for outside call Disable(No Tone) Parallelled Telephone The Telephone in Parallel ring Timed Reminder Cleared You go to your Extention and do the operation as below-

How to set Personal Idendification Number (PIN) on your extention in panasonic ns300 epabx?

Image
You can configure PIN for your extentions. This PIN can be used as Walking COS calling. For more details click on below link- https://onlinewebit.blogspot.com/2019/08/how-to-set-verification-code-in.html Method-1 Press Program Button on KTS Phone Enter the Programing Code (* #) Enter the Password (1234) Enter the Sys Program No (005) Enter Select your Extention Type your PIN  upto 10 digit Enter END Method-2 Login your  Web Maintenance Console Go to  PBX Configuration Click on Extention Click on  Wired Extention Tap on Extention PIN Click on Edit for the desired extention Then you can enter the New  PIN and Confirm New PIN Click on OK . 

How to prevent other people from using your telephone (Extention Dial Lock) in panasonic NS300 EPABX?

Image
You can lock your extention so that other users cannot make unathorised outside calls. Method-1 To Lock To Unlock Note- To unlock your extention first, you have to set Personal Identification Number (PIN) . Details are given in below link- https://onlinewebit.blogspot.com/2019/08/how-to-set-personal-idendification.html Method-2 Another method for locking your extention is the settings of  Verification Code that is described in below link- https://onlinewebit.blogspot.com/2019/08/how-to-set-verification-code-in.html

How to Add/Set Speed Dial Number in panasonic ns300 epabx?

Image
System Speed Dial Number Method-1 Press Program Button on KTS Phone Enter the Programing Code (* #) Enter the Password (1234) Enter the Sys Program No (001) Press Enter Button . Then select Desigred Speed Dial No Go to the Next Then Enter your Mob No. Enter End Method-2 Login your Web Maintenance Console Go to PBX Configuration Click on Features Select System Speed Dial Enter Your Name and Mobile Number One by One

Setup O365 email using the iOS Mail App.

Image
O365 Exchange online email configuration in Apple Phone. Choose your Account after going Settings Select Exchange Enter your email address and password. Tap Next If you are prompted to enter server settings, then enter the following settings. Tap Next  Email:- Full Email Address Server:- outlook.office365.com Username:- Full Email Address Password:- Email Password Then App may prompted a request regarding permission. To agree, tap Yes Tap Save Now you enjoy your setup.

How to add signature in outlook?

Image
Signature adding in MS Outlook. Go to File and click on Options Go to Mail and click on Signature Click on New and type matter in signature box Then click on OK

Windows cannot load the locally stored profile. Possible causes of this error include insufficient security rights or a corrupt local profile. If this problem persists, contact your network administrator.

Image
User Environment- Windows cannot load the locally stored profile. Possible causes of this error include insufficient security rights or a corrupt local profile. If this problem persists, contact your network administrator. Method- 1- Click on OK 2- Go to Control Panel 3- Create another Account as Administrator rights 4- Log off this account 5- Login with new created account 6- Remove the account that is created temporary(automated account that generate this error) 7- At last Run the Command  CHKDSK /R 8- Restart Computer 9- Now you get rid of this error.

How to remove extra line breaks from outlook?

Image
Disable the feature that removes extra line breaks This method disables the feature for all plain text items. To do this, follow these steps:  For Outlook 2010 and later versions: 1.       Open your Outlook. 2.       Go to on the  File  tab, click  Options . 3.       In the  Options  dialog, click on  Mail . 4.       In the  Message format  section, un-check the  Remove extra line breaks in plain text messages . 5.       Click  OK .

How to take Remote Desktop Connection using command?

Image
Microsoft use RDP protocol for Remote Desktop Connection- Go to Run Command Type  mstsc  and press  Enter Then Type  IP Address or Computer Name  and then press  Enter Then after you type  User Name  &  Password  and press  Enter Click on  Yes