Posts

How to route all inbound and outbound emails through a specific email ID in G Suits admin console?

Image
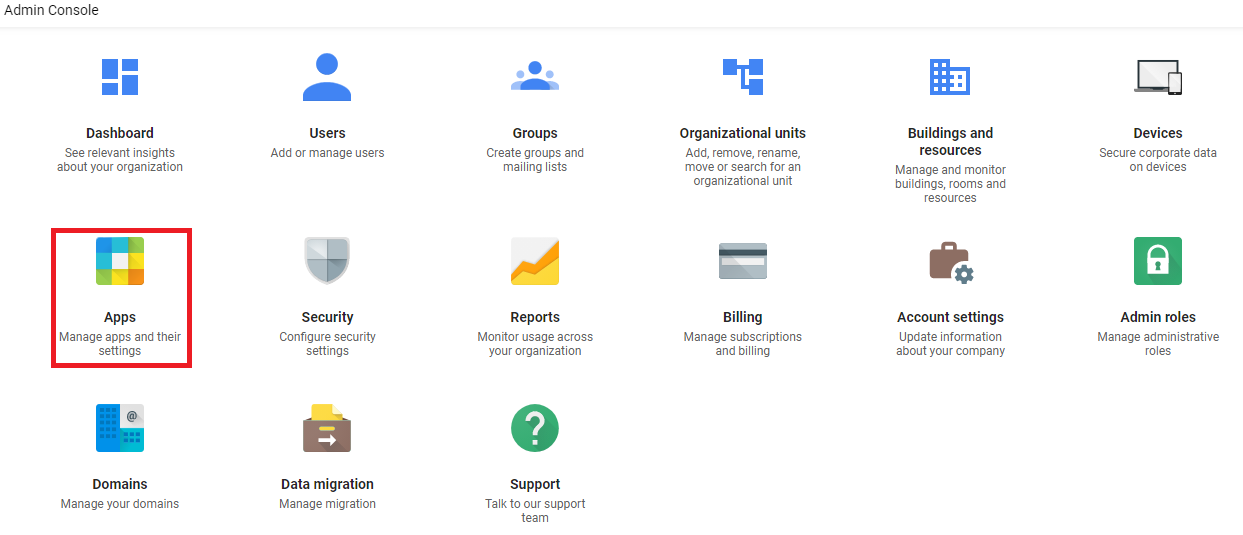
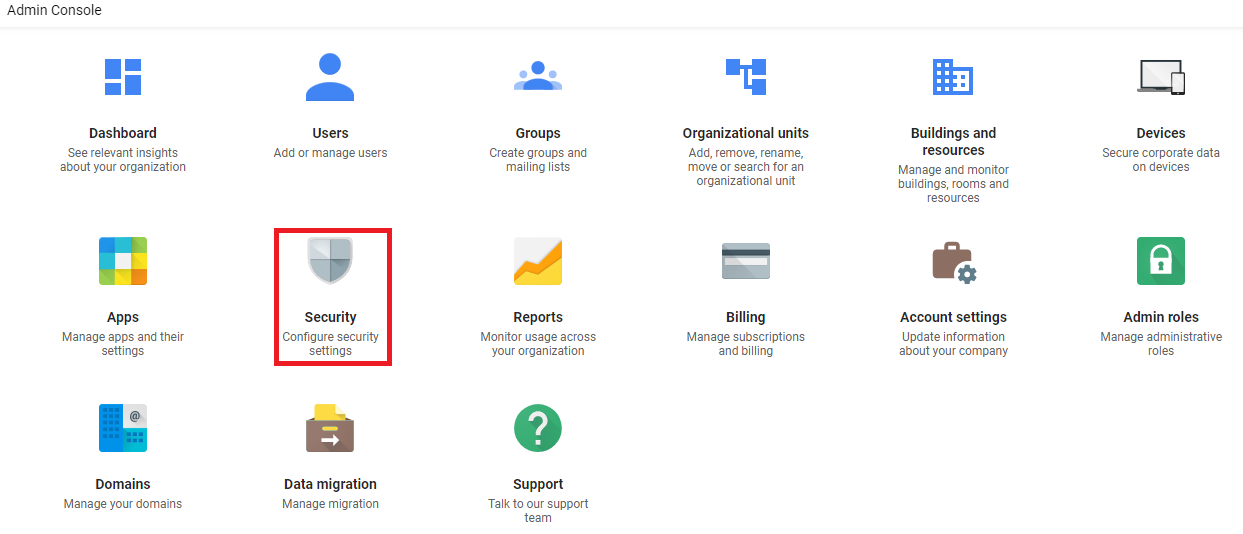
 Email Routing in G Suits- If we have G Suits email account and we want all users incoming and outgoing emails copy receives their manage or HOD then we can do it after creating email routing policy in gmail. Login you G Suits Admin Console Go to Apps Click on G Suits Click on Gmail   Go to Advanced Settings Select your Organization Unit and go to Routing Click on Configure Check on Inbound and Outbound Check on Add more recipient under Also deliver to Add Recipient Click on Save Again click on Save

How to enable two step verification in gmail?

Image
Google 2-Step Verification-   We can protect our email account in both way, first with password and second with phone. After configuring 2-step verification we can provide extra layer of security to our email account. If You have G Suits Account then configure according below steps- Step-1 Login your G Suits Admin Console Go Security from Home Page(Dashboard) Click on 2-Step Verification On the left side of page Select Organization Unit Check Allow users to turn on 2-Step Verification Select Enforcement>Off Click on Save Step-2 Go to Link-  https://myaccount.google.com/ Login your own Email Account with given password  Go to Security Click on 2-Step Verification Click on Get Started Enter your Email Password and click on Next Click on Show more options and select your Security Choice Enter your Phone Number and select your Security Method (Text Message or Phone Call) and click on Next Enter your Code getting by phone and click on Next And in last click on Turn On Note- If

Corona Virus related posts.

Image

How to configure Panasonic NS300 by initial easy setup wizard?

Image
We can configure Panasonic NS300 when we setup new device. you can fallow the below steps- Login EPABX with help of Browser and IP Address (192.168.0.101) User-  INSTALLER  in Capital Letter Password-  1234  (By Default) Click on  Install Enter your  Password Click on  Start Setup Wizard Set the  Time Zone  and  Date/Time Click on  Next Select the CO Access No  (Dial "0") Select  Numbering Plan Click on  Next Set the  Manager Extention Click on  Next Select the CO Dialing Mode  (DTMF) Click on  Next Configure  IP Address Click on  Next Click on  Finish

How to configure Hikvision DVR for Online via cloud(Hik-Connect)?

Image
You can configure your DVR as Online easily way through Hik-connect- Create your account on Hik-Connect after click on the below link             https://www.hik-connect.com/register Fill up the above  forms  correctly Login your  DVR Go to  Network Click on  Advanced Settings Select  Platform Access Check the  Tick  Mark on  Enable After enable Tick enter the  Verification Code Click on  OK Check the  Tick  Mark on  Custom Click on  Save Login your created  Account  with  User & Password Go to  Device Management Click on  Add  Button Enter the Serial Number of  DVR Click on  Search Click on  + Button Enter your  Verification Code Click on  Add Click on  OK Now you  DVR  will be  Online Download  Apps Hik-Connect  on your Phone &  Install Login them with your  Account  with  User  &  Password Now you  Play  your  DVR If Asking  Code(Enter Your Verification Code)

How to turn off possword expiration in O365 or set user password expire?

Image
You can set the password policy for Never Expire in O365 Login Office365 Admin Web Console Expand Settings Go to Security & Privacy Do ON (Set user passwords to never expire) Click on Save Click again on Save Finally you find Never

Just 6 Important Basic Steps for configurartion Panasonic KX-TES824

Image
You can configure Panasonic EPABX System KX-TES824 after fallow just few steps- Enter in programing mode then after you configure just 6 steps as given below- Steps-1 Enter the in programing mode Enter Code "000" Set the Date & Time according to Instructions Date & Time Setup[000] Steps-2 Enter the in programing mode Enter Code "009" Configure Extention Number as given below Plan in Note Extention Number Assigning[009] Note- Programeable number follow as below- Plan 1:   100-199 Plan 2:   100-499 Plan 3:   20-49 Steps-3 Enter the in programing mode Enter Code "121" Select "0" or "9" according you Automatic Line Access[121] Steps-4 Enter the in programing mode Enter Code "401" Select DTMF Dial Mode[401] Steps-5 Enter the in programing mode Enter Code "400" Select "Connect" for you CO Line Select "No Connect" for Blank CO Port