Posts

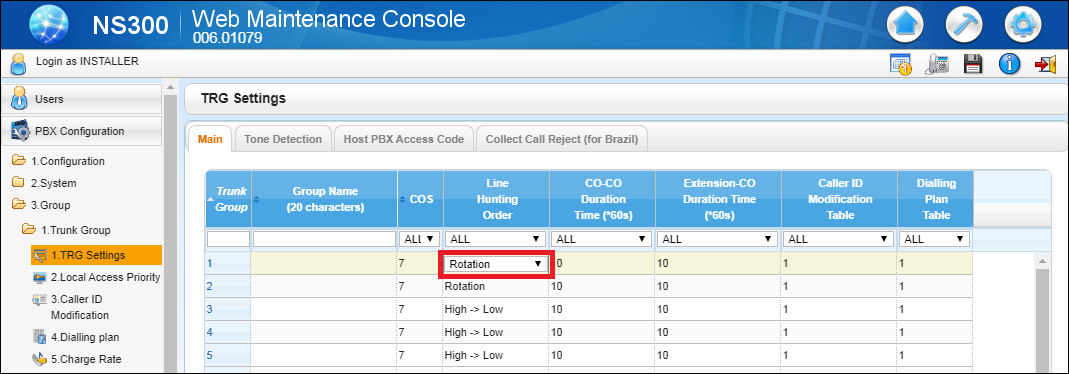
How to configure Trunk Group for calling in panasonic ns300 epabx?
Image
You can configure Trunk Group and manage you CO Lines according you. Step-1 Login your  Web Maintenance Console Go to  PBX configuration Expand Group Select  TRG Settings Go to  Main Select  Rotation in Line Hunting Order Step-2 Login your  Web Maintenance Console Go to  PBX configuration Expand  Group Select Local Access Priority Type the Trunk(CO) Name Step-3 Login your  Web Maintenance Console Go to  PBX configuration Expand CO & Incoming Call Select  CO Line Settings Type the Trunk(CO) Name Set the Trunk Group Number Step-4 Login your  Web Maintenance Console Go to  PBX configuration Expand  Group Select  TRG Settings Go to Hot PBX Access Code Set the "0" for your CO Lines Note- You can use Step-4 when you using verification code for calling and not able to dial call after pressing "0"

How to change the timing for Caller ID and DISA Message in ns300 epabx?

Image
If you found a long gap after DISA message during dialing then you can change the timing of DISA. And also you can chage the timing of Caller ID. Login your  Web Maintenance Console Go to  PBX configuration Expand  System Select Timers & Counters Go to DISA/Door/Reminder/U.Conf Select DISA for change timing Set Delayed Answer Timer (s) "0" Set No Dial Intercept Timer (s) "0" Go to Miscellaneous Select Caller ID for change timing Set Waiting to receive (s) "1" Click on  Apply  and  OK

How to configure panasonic IP Phone if does not disconnect after keeping receiver?

Image
If you keep your IP phone receiver and that not able to connect then we can follow below steps- Login your  Web Maintenance Console Go to  PBX configuration Expand Configuration Select  Slot Go to Extention's Card Property Then change the Flash Timing-Range from 904 to 600ms Click on Apply and OK

How to configure DSS with digital phone in pansonic ns300 epabx?

Image
Step-1 Login your  Web Maintenance Console Go to  PBX Configuration Expand Configuration Click on Slot Go to DLC2 Click on Port Property Go to No-2 Row in Connection Column Click on Fault Click on OUS Go to Column DPT Type and Click on Normal in Row No-2 Select DSS Click on Apply and OK Step-2 Go to again  PBX Configuration Expand Extention Click on DSS Console Select DSS Console Name & No. And Select Paired Extention Click on Apply

How to configure a specific Dialing Number in the place of "0" for some analogue lines in panasonic ns300 epabx?

Image
You can set a seperate Dialing Number for getting Diale Tone after changing Trunk Number- Step-1 Login your  Web Maintenance Console Go to  PBX Configuration Expand  System Click on  Numbering Plan Select  Quick Dial Enter the  Dialing Number  in  Dial Enter  802  in  Phone Number  opposit  Dialing Number            Note- Here digit "4" is seperate Dialing Number. Step-2 Go to again  PBX Configuration Expand  CO & Incoming Call Click on CO Line Settings Enter the  Trunk Number "2" against the desired CO Line Step-3 Go to again  PBX Configuration Expand  Group Click on  Trunk Group Select Local Access Priority Select Blank against Trunk No. Click on Apply and OK

How to configure Call Pickup Number from any extention in panasonic ns300 epabx?

Image
You can pickup you calls from any extention after pressing a single button- Login your  Web Maintenance Console Go to  PBX Configuration Expand  System Click on  Numbering Plan Select  Quick Dial Enter the Call Pickup Number in Dial Enter *4001 in Phone Number opposit Call Pickup Number     Note- Here "7" is the Call Pickup Number.

How to configure DISA message in panasonic ns300 epabx?

Image
DISA Message configuration in panasonic ns300- Step-1 Login your  Web Maintenance Console Go to PBX Configuration Expand  Optional Device Click on Voice Message Select  DISA System Go to Intercept when all DISA ports are busy- Select to AA-9 Go to Intercept when No Dial after DISA answers- Select to AA-9 Step-2 Go to DISA Message Enter the ICD Group or Call Landing Extention Number opposit DISA(501/502) according selection of DISA Intercept in Step-2 Step-3 Go to again  PBX Configuration Expand  Group Click on  Extention Hunting Group Type ICD Group Name Step-4 Go to again  PBX Configuration Expand  Group Click on Incomming Call Distribution Group Select Group Settings Click on Main Go to Distribution Method Set UCD opposit ICD Group Number Step-5 Go to again  PBX Configuration Expand  Group Click on  Incomming Call Distribution Group Select  Group Settings ...